
Monday, July 02, 2012
Steve Silverman Imaging has moved. You can find the new blog by clicking on the previous sentence or navigate to: www.stevesilvermanimaging.com/blog/.
What’s on the new blog? More of the great photos you can see on this blog in a new, easier to navigate, photo friendly format. You’ll find stunning architectural photography, panoramic photography, HD video, and a variety of executive and professional portraits including:
Attorney photos
Accountant photos
Investment advisor photos
Banker photos
Architect photos
Please join us at our new online location!
Friday, December 02, 2011
85 People in a Virtual Group
Recently, I was hired to create individual and group photos for an engineering firm. The last time they had a group photo taken, they all stood together on a pleasant Fall day and someone snapped a picture. They employed around 60 people at the time. Now, they have 85 on staff (and growing!). I encouraged them to create a group photo using my Virtual Group technique. I set up at their offices for 2 days and shot individual photos of each person. This week, I compiled all of them into one group photo.
Here's the final result! Click on the image to enlarge it.

For more information,www.stevesilvermanimaging.com
4445 W. 77th St. #130
Edina, MN 55435
952-844-0119 c952-905-1197
Here's the final result! Click on the image to enlarge it.

For more information,
4445 W. 77th St. #130
Edina, MN 55435
952-844-0119 c952-905-1197
Tuesday, November 08, 2011
Recent Architectural Projects
Here is a selection of the projects keeping me busy over the last month. Almost all of these images were shot and processed as HDR images. Click on each image to enlarge it.
Central Corridor Light Rail construction. My client, an engineering firm, is providing a broad spectrum of design services for this project including landscape architecture and various aspects of the street and sidewalk design. This project is transforming University Ave. in St. Paul.

The designers created an old/new kitchen from scratch in this pre-war Highland Park, MN, home. Doesn't it look like it's always been there? The space was so tight this image was actually created by merging two images, one taken from the floor to the counter and another from the counter to the ceiling.

This is an upscale handicapped bathroom in a private residence in Eden Prairie. The design/build firm found unique features to make this room not only functional but a warm and attractive environment for their client. The room features a roll in shower, low shelves and counters, an electronically controlled toilet/bidet, as well as a double hinged door for emergency access.

A Mexican restaurant in Rosemount, MN. This talented architect makes creative use of inexpensive materials to bring projects to fruition at amazingly low costs/square foot.

This is the activity building for a nature center in Ramsey County. Part of an environmental education facility, this project creates traditional "kid" activities that many children may not have easy access to .

For more information,www.stevesilvermanimaging.com
4445 W. 77th St. #130
Edina, MN 55435
952-844-0119 c952-905-1197
Central Corridor Light Rail construction. My client, an engineering firm, is providing a broad spectrum of design services for this project including landscape architecture and various aspects of the street and sidewalk design. This project is transforming University Ave. in St. Paul.

The designers created an old/new kitchen from scratch in this pre-war Highland Park, MN, home. Doesn't it look like it's always been there? The space was so tight this image was actually created by merging two images, one taken from the floor to the counter and another from the counter to the ceiling.

This is an upscale handicapped bathroom in a private residence in Eden Prairie. The design/build firm found unique features to make this room not only functional but a warm and attractive environment for their client. The room features a roll in shower, low shelves and counters, an electronically controlled toilet/bidet, as well as a double hinged door for emergency access.

A Mexican restaurant in Rosemount, MN. This talented architect makes creative use of inexpensive materials to bring projects to fruition at amazingly low costs/square foot.

This is the activity building for a nature center in Ramsey County. Part of an environmental education facility, this project creates traditional "kid" activities that many children may not have easy access to .

For more information,
4445 W. 77th St. #130
Edina, MN 55435
952-844-0119 c952-905-1197
Friday, October 14, 2011
The flexibility of Virtual Group Photography
Last year, I photographed a group of financial advisors "virtually" and placed them in their office (see the earlier post using this group).

Recently, they informed me one of the advisors had left the firm. The group was easily, economically, and quickly recomposed without having to reshoot. A great example of the value of this type of photography.

For more information,www.stevesilvermanimaging.com
4445 W. 77th St. #130
Edina, MN 55435
952-844-0119 c952-905-1197

Recently, they informed me one of the advisors had left the firm. The group was easily, economically, and quickly recomposed without having to reshoot. A great example of the value of this type of photography.

For more information,
4445 W. 77th St. #130
Edina, MN 55435
952-844-0119 c952-905-1197
New Retouching Example
Here is an example of a recent retouching challenge involving opening one squinting eye. Take a look at the before and after photos. The open eye was borrowed from another photo taken in the sequence. This retouching was done at the client's request. Click on the image to enlarge it and see the detail.

For more information,www.stevesilvermanimaging.com
4445 W. 77th St. #130
Edina, MN 55435
952-844-0119 c952-905-1197

For more information,
4445 W. 77th St. #130
Edina, MN 55435
952-844-0119 c952-905-1197
Monday, October 03, 2011
Unique Event Photography
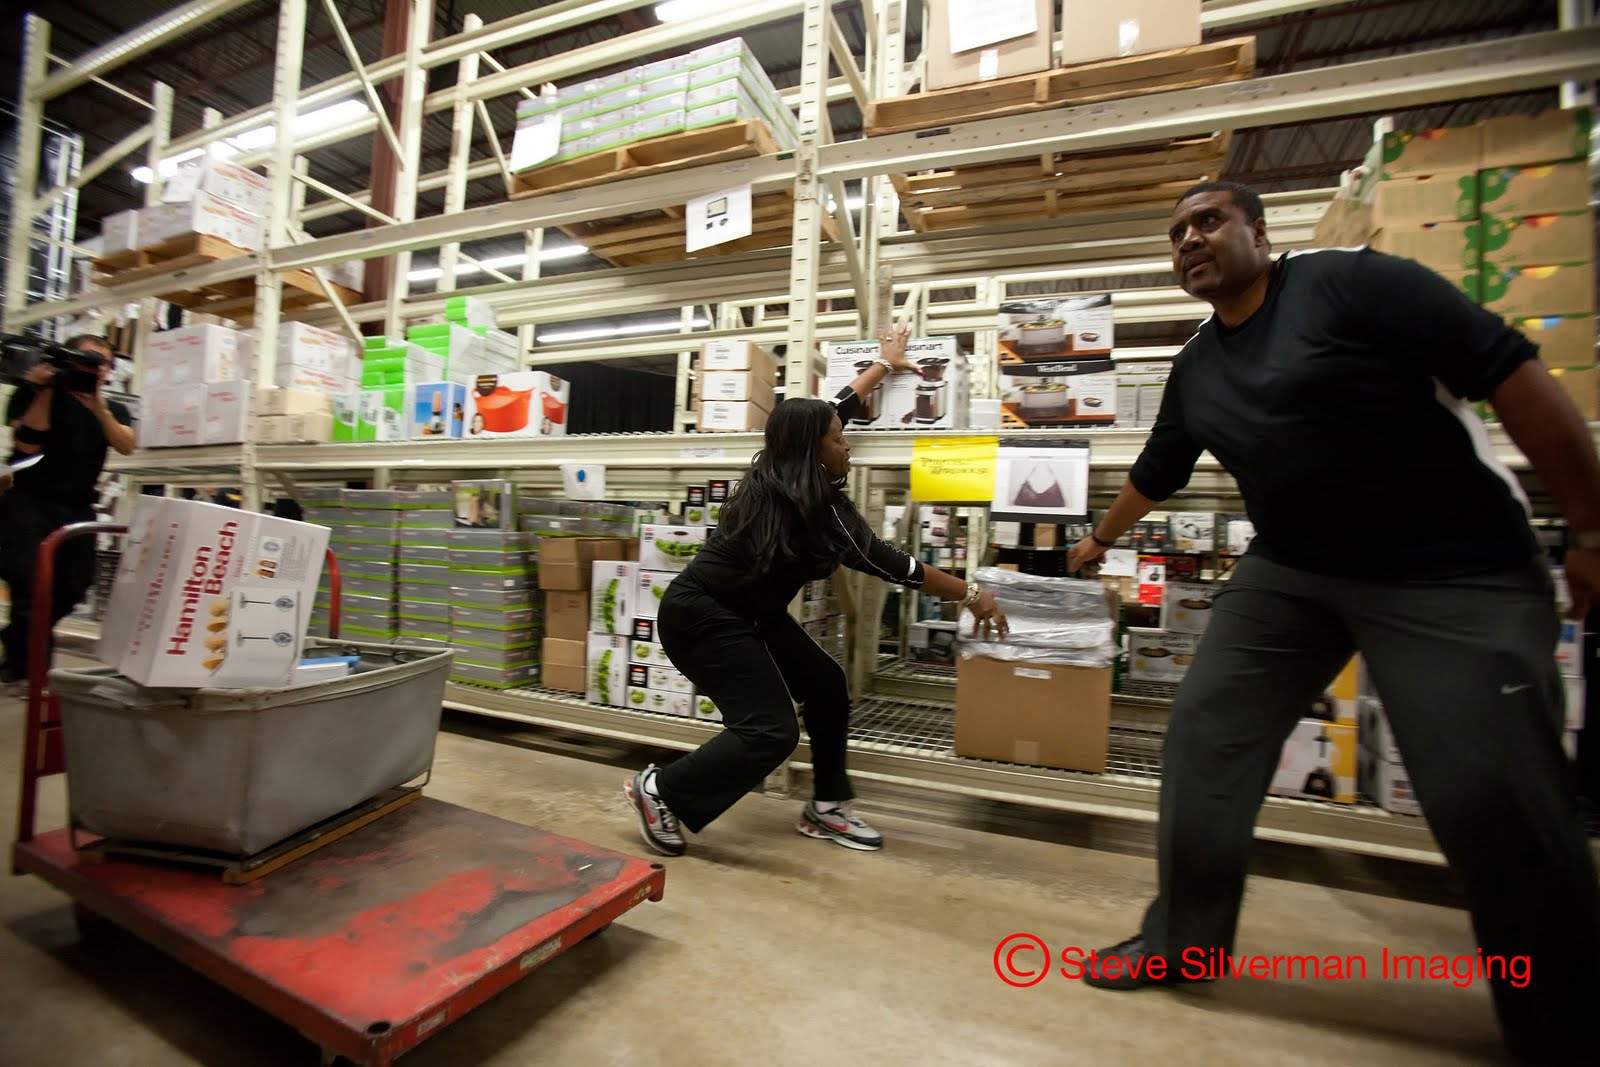
Recently, I was hired by one of the nation's top event planners, Fourth Wall Events, to shoot a unique project for one of their clients, a large communications company. They brought 200 of their top performers to the Twin Cities to celebrate their sales achievement. As part of the weekend, they created a special event where each person was given the opportunity to run through a warehouse full of goodies ranging from flat screen TV's to diamond jewelry to just about anything Cuisinart and grab anything and everything they wanted in 90 seconds. It was crazy/nuts/fun! Be sure to click on each image to enlarge it.
Fourth Wall Events


See more of the featured images (culled from over 300 final images submitted to the client) here:
Features
For more information,www.stevesilvermanimaging.com
4445 W. 77th St. #130
Edina, MN 55435
952-844-0119 c952-905-1197


See more of the featured images (culled from over 300 final images submitted to the client) here:
For more information,
4445 W. 77th St. #130
Edina, MN 55435
952-844-0119 c952-905-1197
Thursday, September 22, 2011
Virtual Groups: Your Group Photos Grow As Your Firm Grows
Virtual Groups© gives you the flexibility to create and add to group photos without costly reshooting. It also makes scheduling easy because everyone has their photos done at their convenience. Click on each image to enlarge it.
The original project was to photograph the partners in a law firm and create a Virtual Group. The attorneys came to the studio separately for their photos. We created this group photo.

The partners liked the group photo so well, they decided to add the associates.

One of the attorneys wanted to try a different pose.

Recently, Jim joined the firm. He came to the studio for portraits and we seamlessly added him to the group.

For more information,www.stevesilvermanimaging.com
4445 W. 77th St. #130
Edina, MN 55435
952-844-0119 c952-905-1197
The original project was to photograph the partners in a law firm and create a Virtual Group. The attorneys came to the studio separately for their photos. We created this group photo.

The partners liked the group photo so well, they decided to add the associates.

One of the attorneys wanted to try a different pose.

Recently, Jim joined the firm. He came to the studio for portraits and we seamlessly added him to the group.

For more information,
4445 W. 77th St. #130
Edina, MN 55435
952-844-0119 c952-905-1197
Friday, September 16, 2011
Recent Architectural Work--US Bank
One of my clients, a general contractor, meticulously restored the former Minneapolis Floral into a showcase US Bank. Click on each image to enlarge it.

This is a vertical panoramic image, a lower image combined with a higher image.


For more information,www.stevesilvermanimaging.com
4445 W. 77th St. #130
Edina, MN 55435
952-844-0119 c952-905-1197

This is a vertical panoramic image, a lower image combined with a higher image.


For more information,
4445 W. 77th St. #130
Edina, MN 55435
952-844-0119 c952-905-1197
Art of Shaving-Mall of America
I shot this very splashy retail concept at Mall of America for one of my architectural clients. These are all HDR (High Dynamic Range) images. Click on each image to enlarge it and see the detail!


For more information,www.stevesilvermanimaging.com
4445 W. 77th St. #130
Edina, MN 55435
952-844-0119 c952-905-1197


For more information,
4445 W. 77th St. #130
Edina, MN 55435
952-844-0119 c952-905-1197
Tuesday, September 13, 2011
Recent Architectural Work--Buffalo Wild Wings
One of my clients designs restaurants and other retail projects for national and regional companies. This Buffalo Wild Wings is located in Hutchinson, MN. Be sure to click on each image to enlarge it.
These images are processed as HDR (High Dynamic Range) and tweaked in Photoshop.


This is a cylindrical panoramic processed through PTIGui.

For more information,www.stevesilvermanimaging.com
4445 W. 77th St. #130
Edina, MN 55435
952-844-0119 c952-905-1197
These images are processed as HDR (High Dynamic Range) and tweaked in Photoshop.


This is a cylindrical panoramic processed through PTIGui.

For more information,
4445 W. 77th St. #130
Edina, MN 55435
952-844-0119 c952-905-1197
Monday, August 29, 2011
Virtual Backgrounds...save time and money
Here is a great example from a recent photo shoot. Traveling downtown and setting up in my client's conference room for one photo of one person was cost prohibitive. We brought him to the studio and shot photos of him virtually. Using file images of the client's conference room, we just stitched him into the room!

For more information,www.stevesilvermanimaging.com
4445 W. 77th St. #130
Edina, MN 55435
952-844-0119 c952-905-1197

For more information,
4445 W. 77th St. #130
Edina, MN 55435
952-844-0119 c952-905-1197
Medium and Large Size Groups...Virtually!
Medium and large size groups can be effectively composed by using virtual imaging. Individuals in these shots were photographed, in some cases, more than 2 years apart.
Click on each image to enlarge it.


For more information,www.stevesilvermanimaging.com
4445 W. 77th St. #130
Edina, MN 55435
952-844-0119 c952-905-1197
Click on each image to enlarge it.


For more information,
4445 W. 77th St. #130
Edina, MN 55435
952-844-0119 c952-905-1197
Thursday, August 25, 2011
Recent Architectural Work
I recently completed shooting for this project in Brooklyn Park, MN. The shooting took place over 2 sessions to take advantage of the position of the sun and to shoot twilight photos. Be sure to click on the images to enlarge them for detail.


For more information,www.stevesilvermanimaging.com
4445 W. 77th St. #130
Edina, MN 55435
952-844-0119 c952-905-1197


For more information,
4445 W. 77th St. #130
Edina, MN 55435
952-844-0119 c952-905-1197
Tuesday, August 23, 2011
Panoramics boost field of view and resolution
Newly acquired software for stitching and optimizing panoramic images is useful for more than creating wide images. The following example, shot at the U of M School of Veterinary Medicine enabled me to shoot a tight space from one corner to another. Simply using a wide angle lens (I used a 24mm Tilt/Shift) by itself doesn't do the job.
By shooting 2 different images, using a panoramic tripod head, I can show the entire room.


For more information,www.stevesilvermanimaging.com
4445 W. 77th St. #130
Edina, MN 55435
952-844-0119 c952-905-1197
By shooting 2 different images, using a panoramic tripod head, I can show the entire room.


For more information,
4445 W. 77th St. #130
Edina, MN 55435
952-844-0119 c952-905-1197
Wednesday, August 10, 2011
More Vacation Photos!
From our recent trip to Martha's Vineyard, off the coast of Cape Cod.
Many of these were taken with my Canon G11 which is a pretty snappy camera as a carry around. I'm particularly pleased with the last one, hand held (positioned against a post for stability), in low light.


For more information,www.stevesilvermanimaging.com
4445 W. 77th St. #130
Edina, MN 55435
952-844-0119 c952-905-1197
Many of these were taken with my Canon G11 which is a pretty snappy camera as a carry around. I'm particularly pleased with the last one, hand held (positioned against a post for stability), in low light.


For more information,
4445 W. 77th St. #130
Edina, MN 55435
952-844-0119 c952-905-1197
Subscribe to:
Posts (Atom)